


How do I use Progenesis with Symphony?
You can use the Symphony software to automate creating Progenesis experiments and importing runs into them immediately as they're acquired in MassLynx.
Initial setup
To use Progenesis in Symphony pipelines, you need to create a Progenesis task configuration. You only need to do this once. To create the task configuration, start the Symphony client application and click the New task button in the Task Configuration Editor group in the left pane.

New task button in Symphony
Click the ... button to the right of the Module field in the top-right and browse to the Progenesis QI.exe file in the Progenesis QI installation directory, e.g. C:\Program Files (x86)\Nonlinear Dynamics\Progenesis QI.

Browse for module button in Symphony
The Description and Version fields are filled out automatically. Enter a recognisable task name in the Task name field, e.g. Import data into Progenesis QI experiment. Leave the Conditional execution options unchecked and fill out the Execution command specification as follows:
- Add a /symphony switch without an argument.
- Add a /experimentName= switch with the argument specified as
#progenesis-experiment-name. You will need to provide a value for
#progenesis-experiment-name in any pipelines you build that use the task – it should be set to the name of experiment to import the data into.
Because the main experiment file will have that name, it cannot contain characters that are forbidden in file names, such as any of the following:
"<>|:*?\/ - Add a /outputFolder= switch with the argument specified as #progenesis-output-folder. This switch controls the output folder the experiment files are to be placed in.
- Add a /importSettings= switch with the argument specified as #progenesis-import-settings. This switch controls the path to the file containing settings for experiment creation and raw data import that you normally set in the user interface of Progenesis QI. The format of the file and the available options are described further on this page.
- Finally, add a /rawData= switch with the argument specified as #rawdatapath. The value will be provided by Symphony – it’s the path to the .raw data folder that's been acquired.
Afterwards, it should look like this:
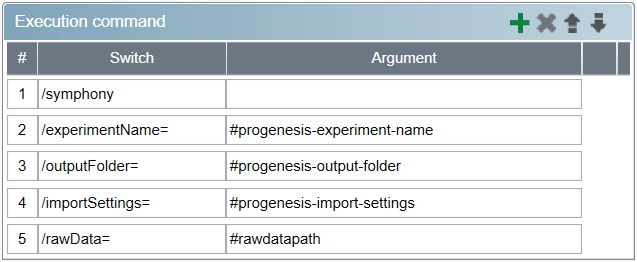
Execution command specification for a task in Symphony
Click the Save task button in the bottom-right to complete this one-time initial setup.
Pipeline setup
The task created during the initial setup allows you to import data into a Progenesis experiment. Because Symphony pipelines run without user interaction, you need to specify all the settings required for creating an experiment and importing data that you normally do in Progenesis, via a settings file. It’s an XML file with the following syntax:
<Project>
  <Common>
    <Polarity>Positive</Polarity>
    <DataType>Profiled</DataType>
  </Common>
  <Import>
    <FilterStrength>0.8</FilterStrength>
    <PluginParameters>
      <Parameter Key="UseLockMassCalibration" Value="True" />
      <Parameter Key="LockMassValue" Value="556.2766" />
      <Parameter Key="ApplyDeadTimeCorrection" Value="True" />
      <Parameter Key="Resolution" Value="10000" />
      <Parameter Key="EffectiveTubeLength" Value="1800" />
      <Parameter Key="EffectiveVoltage" Value="5500" />
    </PluginParameters>
  </Import>
  <Adducts>
    <Adduct>M+H</Adduct>
    <Adduct>M+2H</Adduct>
    <Adduct>M+3H</Adduct>
    <Adduct Multiplier="2" Charge="4" MassShift="4.029105728">2M+4H</Adduct>
  </Adducts>
</Project>
An example settings file specifying all possible settings.
Project > Common > Polarity element: can be either Positive or Negative. Required. Specifies the ionisation polarity of the runs to be imported.
Project > Common > DataType element: can be either Profiled or Centroided,
the latter requiring a Resolution attribute (like so: <DataType Resolution="20000">Centroided</DataType>).
Required. Specifies the data type of the runs to be imported.
Project > Import > FilterStrength element: specifies the filter strength, normally set at the Import Data screen. Optional, defaults to 1.
Project > Import > PluginParameters > Parameter elements: specify settings normally set in the Waters .raw folder plug-in wizard. The following settings are available:
- Key="UseLockMassCalibration" – whether to apply lock mass calibration. Optional. The default value depends on the acquisition settings – and is most often True, if a lock mass function is present in the .raw folder and no real time lock mass calibration has been performed.
- Key="LockMassValue" – the mass of the lock mass compound to use if performing lock mass calibration. Optional. Defaults to 556.2766 m/z with positive ionisation and 554.2620 m/z with negative ionisation.
- Key="ApplyDeadTimeCorrection" – whether to apply dead time correction, for data acquired with Waters TDS ToF instruments. Optional, defaults to False.
- Key="Resolution", Key="EffectiveTubeLength" and Key="EffectiveVoltage" – if applying dead time correction, these settings are required if missing in the .raw folder. If you are unsure if they need to be specified, try importing a single run in Progenesis first to see if the Waters .raw folder plug-in wizard asks you to enter them.
Project > Adducts > Adduct elements: specify adducts added to the experiment when it’s first created (do note that you can still change the experiment adducts before peak picking). They can be either library adducts (as in, pre-defined), like M+H, M+2H and M+3H in the example above, or custom adducts, in which case the Multiplier, Charge and MassShift attributes need to be specified (with negative values for Charge for negative ions), like with 2M+4H above. At least one Adduct element is required.
Note that the created experiment is always set to use the High resolution mass spectrometer instrument type.
The minimal settings file (with only the required settings) looks as follows:
<Project>
  <Common>
    <Polarity>Positive</Polarity>
    <DataType>Profiled</DataType>
  </Common>
  <Adducts>
    <Adduct>M+H</Adduct>
  </Adducts>
</Project>
A minimal settings file.
Make sure you know where you want to save the Progenesis experiment and that the folder exists. Create the settings file and place it somewhere, preferably next to the folder you wish to create the Progenesis experiment in. In Symphony, click the New pipeline button in the Pipeline Builder group in the left pane.
New pipeline button in Symphony
Give the pipeline a name by entering it in the Pipeline name field at the top. Drag the task you created from the Task library to the Build pipeline area. Fill out the data keys' values:
Set the #progenesis-experiment-name key’s value to the name of the experiment you wish to create, e.g. Rat lipidomics initial study, its type to Text and condition to None.
Set the #progenesis-output-folder key’s value to the name of an existing folder you wish to save the experiment in, its type to File and condition to Exists. Do note that the Symphony pipeline runs under the local system account which needs to be able to access this folder; this is mostly relevant when saving to a network location.
Set the #progenesis-import-settings key’s value to the full path of the import settings file created previously. This file too needs to be accessible by the local system account.
The completed minimal pipeline should look similar to:
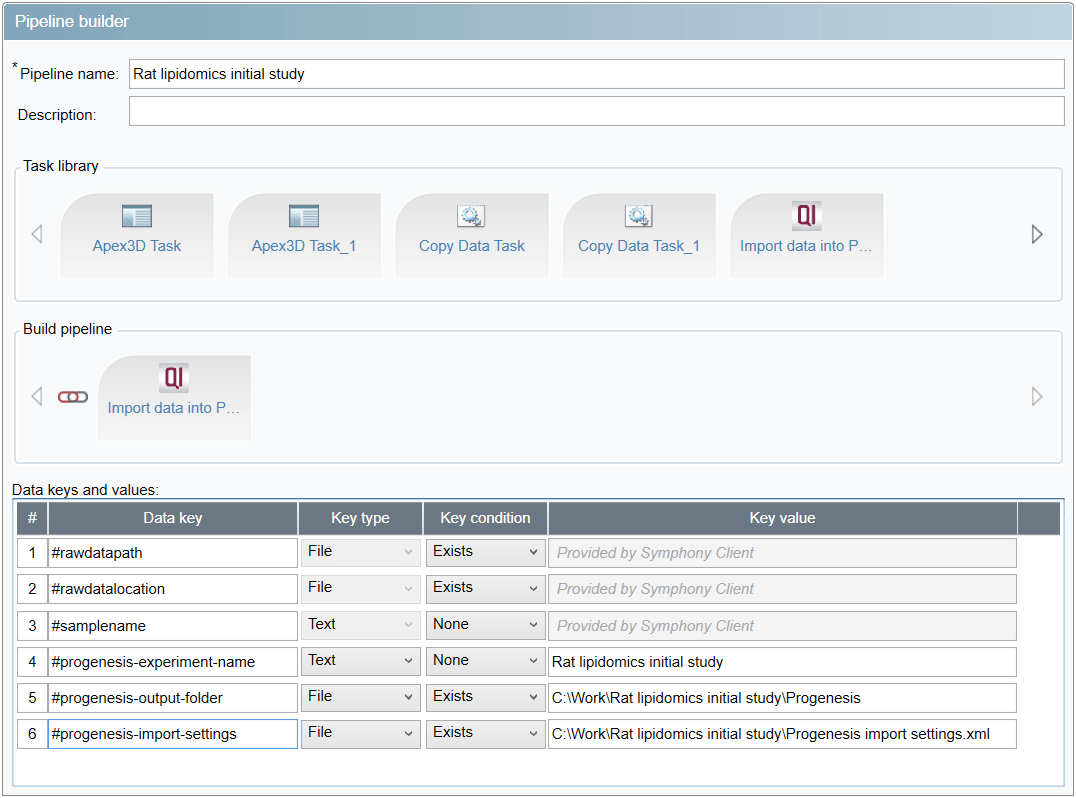
Example Symphony pipeline using Progenesis
In MassLynx, when specifying the Process step to use, select the newly created pipeline (by default stored in the C:\Symphony\Pipelines\ directory as a file with an .xml extension) as the parameter to the MassLynxSymphonyClient.exe executable – consult the Symphony tutorials in its online help for details.
You can then run your samples. The first run will be imported into a new experiment, and any further ones will be added to that experiment.
Troubleshooting
You can see the outcome of any pipelines run in the Status Monitor, by clicking on the icon in the Logs column. Of most interest is the output of Progenesis, which you can see under Output console in the MetaData field after selecting the corresponding Execution task finished: note in Notes.
Status Monitor button in Symphony

Logs button in Status Monitor
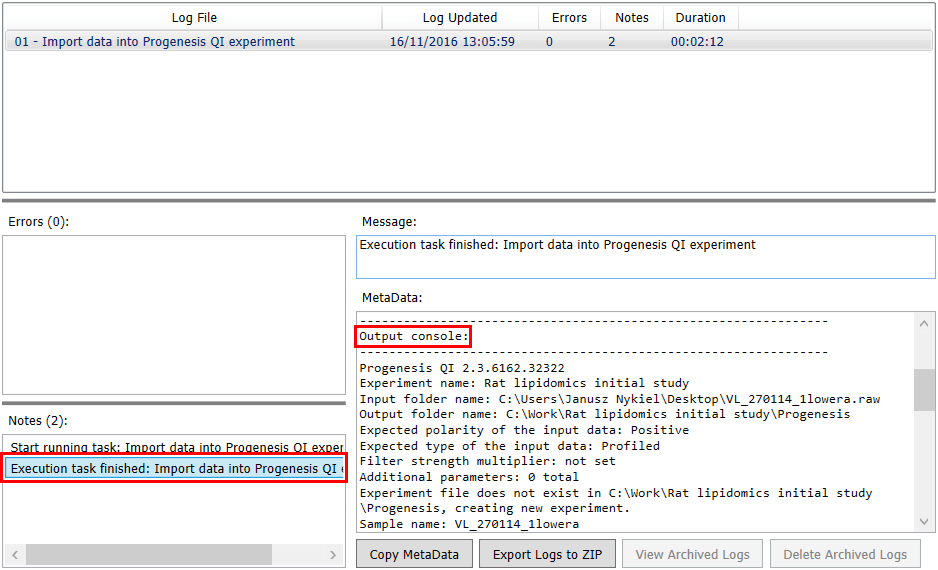
Progenesis output in Symphony Logs Viewer
Library adducts
| Adduct name | Mass shift | Charge | Multiplier |
|---|---|---|---|
| M+H-2H2O | -35.01385294 | 1 | 1 |
| M+H-H2O | -17.00328825 | 1 | 1 |
| M+H | 1.007276432 | 1 | 1 |
| M+NH4 | 18.03382553 | 1 | 1 |
| M+Na | 22.98922068 | 1 | 1 |
| M+CH3OH+H | 33.03349118 | 1 | 1 |
| M+K | 38.96315808 | 1 | 1 |
| M+ACN+H | 42.03382553 | 1 | 1 |
| M+2Na-H | 44.97116493 | 1 | 1 |
| M+ACN+Na | 64.01576978 | 1 | 1 |
| M+2H | 2.014552864 | 2 | 1 |
| M+H+Na | 23.99649711 | 2 | 1 |
| M+2Na | 45.97844136 | 2 | 1 |
| M+3H | 3.021829296 | 3 | 1 |
| M+2H+Na | 25.00377355 | 3 | 1 |
| M+2Na+H | 46.98571779 | 3 | 1 |
| 2M+H | 1.007276432 | 1 | 2 |
| 2M+NH4 | 18.03382553 | 1 | 2 |
| 2M+Na | 22.98922068 | 1 | 2 |
| 2M+3H2O+2H | 28.02312 | 2 | 2 |
| 2M+K | 38.96315808 | 1 | 2 |
| 2M+ACN+H | 42.03382553 | 1 | 2 |
| 2M+ACN+Na | 64.01576978 | 1 | 2 |
| M-H2O-H | -19.01784112 | -1 | 1 |
| M-H | -1.007276432 | -1 | 1 |
| M+Na-2H | 20.97466782 | -1 | 1 |
| M+Cl | 34.9694013 | -1 | 1 |
| M+K-2H | 36.94860522 | -1 | 1 |
| M+FA-H | 44.99820287 | -1 | 1 |
| M-2H | -2.014552864 | -2 | 1 |
| M-3H | -3.021829296 | -3 | 1 |
| 2M-H | -1.007276432 | -1 | 2 |
| 2M+FA-H | 44.99820287 | -1 | 2 |
| 2M+Hac-H | 59.013851 | -1 | 2 |
| 3M-H | -1.007276432 | -1 | 3 |