

How do I manually align runs that fail to align automatically?
If the automatic alignment process fails to align your runs correctly it can be useful to place some manual alignment vectors prior to performing the automatic alignment – these seed vectors give the software a better starting point and are a quick way to improve alignment through a combined manual and automatic approach.
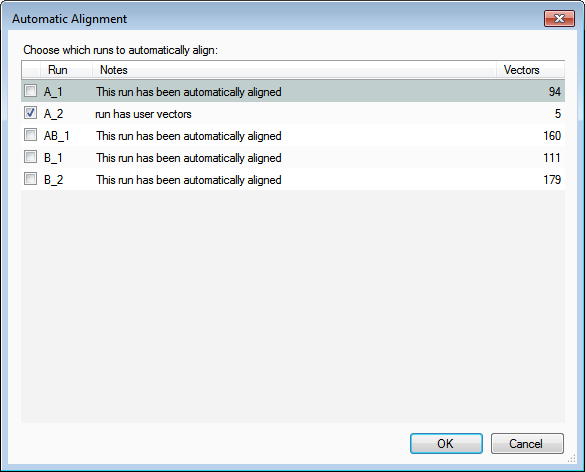
After performing the automatic alignment, Progenesis may alert you that 1 or more runs failed to align – these runs will have no vectors at all and will immediately be flagged as requiring attention. You may notice poor alignment for other runs using the scoring metrics or by the vector count (a noticeably lower number of vectors tends to be indicative of poor alignment).
To improve alignment, first you’ll want to delete any automatic vectors for the run in question – you can do this by selecting the run from the list in the alignment table (once selected it will be highlighted in green) and then clicking on Remove Vectors | Automatic vectors in the whole run.
The next step is to place a few manual vectors; for best results, approximately 5 vectors evenly distributed across the entire run is recommended:
- First, ensure you’ve selected the run you wish to work on and that it no longer contains any vectors.
- Check that you are set up so your view reflects the alignment being applied by selecting the drop down arrow next to Show Aligned and selecting Always Show Aligned.
- Zoom in on the Vector editing window so that you can see the ions clearly
- Click and hold on a green ion in the Vector editing window and drag it over the top of the corresponding magenta (reference run) ion – a red box should appear around the ions when they’re overlapped.
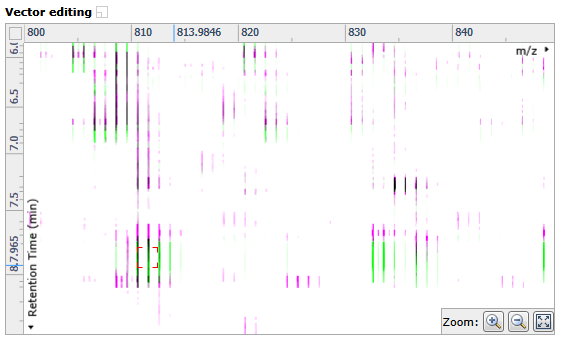
Note: An incorrectly placed vector can be removed by right clicking on it in the Vector editing window. - Repeat this process moving the focus from top to bottom on the Ion intensity map window until you have around 5 vectors.
Note: The number of vectors you add is recorded in the alignment table. - Repeat actions 1-6 for any other runs where alignment has failed.
- Finally, rerun the automatic alignment, which will use these seed vectors as a starting point. To do this select Align runs automatically and then click OK: